We're slowly being icicled into our house. We've actually broken them off a few times already, but at this point, I'm just curious to see how big they'll get. We'll just use the side door for the time being.
Showing posts with label House. Show all posts
Monday, December 27, 2010
Sunday, October 24, 2010
Sunday, August 29, 2010
Isaac and baby's room rearrange
Ok, we don't have Isaac's headboard yet, but his big boy bed arrived. We put on the sheets that he picked out {sports - surprise, surprise}, and he has happily slept in his bed for three full nights. We are on night #4. He loves it, we love it, and I think we did a good job re-arranging the cozy room. :)


Sunday, August 22, 2010
House Tour: Isaac and baby's room
Well, for now it's still just Isaac's room. We officially ordered him a "big boy bed" late last week, so the arrangement of the room will change {another post for another day} and part of the reason we haven't put much on the walls just yet. The new paint is appearing blue {partially because of the rug}, but it's more of a nice warm gray. It'll be really cozy when there are two kids in there, but I just love all of the natural light that comes in during the day - such a happy, warm place. Isaac's room is actually one of Blake's favorites in the whole house.
Things we did:
1. Re-finish floor
2. Replace windows
3. Paint {walls and ceiling!}
4. Add one outlet
5. Replace window treatments
6. Remove old light and add ceiling fan

Things we did:
1. Re-finish floor
2. Replace windows
3. Paint {walls and ceiling!}
4. Add one outlet
5. Replace window treatments
6. Remove old light and add ceiling fan
Before
After
Wednesday, August 18, 2010
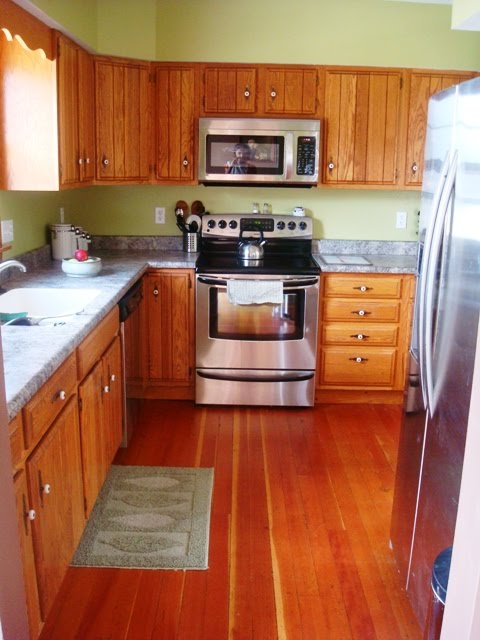
House Tour: Kitchen
Our kitchen re-do quickly became the, "well, we're already doing this, so what's the big deal if we do this too?" room. I'm happy with how it turned out though. Here's the rundown:
1. New appliances
2. Replace cabinet door
3. Take old pantry out of garage, cut down to create cabinet and more counter space by fridge {Thank heavens for handy uncles!}
4. New countertops
5. New undermount sink
6. New faucet
7. New garbage disposal - because we couldn't detach the other one from the old sink {too much silicone gel used in the previous do-it-yourself project.}
8. Replace all electrical outlets and switches
9. Add outlet by the new cabinet/counter by fridge
10. New paint!
11. Remove breadbox
12. Take down shelf-y thing by the window and above the door to the kitchen {I don't think you can see either of those}.
13. Clean and decorate a little :)
14. Sand and re-finish floor
15. Shorten cabinets above microwave by about 6" so that the unit is flush with the cabinets and not hanging below! {Again, thanks to a handy uncle!}
Still on my to-do list: replace cabinet hardware, but that can wait for now. Ta-Da!!!! :)

1. New appliances
2. Replace cabinet door
3. Take old pantry out of garage, cut down to create cabinet and more counter space by fridge {Thank heavens for handy uncles!}
4. New countertops
5. New undermount sink
6. New faucet
7. New garbage disposal - because we couldn't detach the other one from the old sink {too much silicone gel used in the previous do-it-yourself project.}
8. Replace all electrical outlets and switches
9. Add outlet by the new cabinet/counter by fridge
10. New paint!
11. Remove breadbox
12. Take down shelf-y thing by the window and above the door to the kitchen {I don't think you can see either of those}.
13. Clean and decorate a little :)
14. Sand and re-finish floor
15. Shorten cabinets above microwave by about 6" so that the unit is flush with the cabinets and not hanging below! {Again, thanks to a handy uncle!}
Still on my to-do list: replace cabinet hardware, but that can wait for now. Ta-Da!!!! :)
Kitchen After
Friday, August 13, 2010
Bathroom
I know I said I wouldn't get around to posting the before/after pics of our house until next week. But, I realized this morning that our bathroom is actually completely finished {minus the minor paint touch up that you can't see}, and I can't do the weeding of my garden that I wanted to do because it's raining. So, photo/explanation tour....begin!
Things we did to the bathroom {Because you can't see all of the big changes from one photo, and I didn't take pictures of everything in the beginning}:
1. New paint - the wall behind the toilet/cabinet/sink was green, now it's white
2. Replace old, painted medicine cabinet {which also involved added new dry wall to cover the hole in the wall}.
3. Replace painted 1975-looking bulbed light fixture {which also involved moving the light higher, and patching in with dry wall}.
4. Remove giant white cabinet to open it up and create more space, only to discover bolt holes, non-textured wall {NOT matching the rest of the rest of the bathroom}, and trim removal.
5. Call in the plaster guy to match the funky wall texture
6. New sink, medicine cabinets, and toilet seat
7. Master craftsman, Dad, moves trim over from behind our new sink to fill in missing trim hole that was behind giant white cabinet.
8. Same master craftsman re-wired and switched out light switches.
Things we did to the bathroom {Because you can't see all of the big changes from one photo, and I didn't take pictures of everything in the beginning}:
1. New paint - the wall behind the toilet/cabinet/sink was green, now it's white
2. Replace old, painted medicine cabinet {which also involved added new dry wall to cover the hole in the wall}.
3. Replace painted 1975-looking bulbed light fixture {which also involved moving the light higher, and patching in with dry wall}.
4. Remove giant white cabinet to open it up and create more space, only to discover bolt holes, non-textured wall {NOT matching the rest of the rest of the bathroom}, and trim removal.
5. Call in the plaster guy to match the funky wall texture
6. New sink, medicine cabinets, and toilet seat
7. Master craftsman, Dad, moves trim over from behind our new sink to fill in missing trim hole that was behind giant white cabinet.
8. Same master craftsman re-wired and switched out light switches.
Saturday, June 5, 2010
Rugs
The entire first floor of our new home is covered in beautiful wood flooring {including the bedrooms} which also means more rugs. We're going with more neutral based tones to lighten up the rooms, and I'm really liking this rug {or something similar} for the living room. Doesn't it just look so plush and cushy? I want to nap on it. Now.
However, here are my problems with it:
1. It's white {even though I want white, I don't for a variety of reasons. Namely, that I'll soon have two little munchkins running around!}
2. The price isn't perfect
3. I fear a Pocket Sophie revolution. I'm sure it'll show up WAY more than it ever did on my darker rugs.
4. If it doesn't work in the living room, do I dare try to use it in our bedroom?
1. It's white {even though I want white, I don't for a variety of reasons. Namely, that I'll soon have two little munchkins running around!}
2. The price isn't perfect
3. I fear a Pocket Sophie revolution. I'm sure it'll show up WAY more than it ever did on my darker rugs.
4. If it doesn't work in the living room, do I dare try to use it in our bedroom?
Thursday, June 3, 2010
Kitchen
Sunday, May 23, 2010
Dining Room
Here's a look at our dining area - first from near the entryway {to the right is the living room}, and then a closer look. The soon-to-be gone painted ceilings continue throughout most of the house, and isn't that dining room light fixture gorgeous? :) We plan on adding a deck off of the dining room before we move in {right where that window is}. Make sure you take advantage of the tiny peek of the kitchen through that cute little arched doorway, and you might also notice a couple charming steps in the bottom corner of the second picture. Aren't you just excited to continue seeing our new home? I'm just dying to move in!

Tuesday, May 18, 2010
Step inside
...our soon-to-be new home! I'm finally getting around to giving you all the tour. Sorry it took so long! :)
Here's the front door/entry from the living room

And, here's the living room. We plan on painting to lighten it up a bit, making it more airy {especially those painted ceilings!}, but just LOVE the warmth and charm of the area! Super cute!
Here's the front door/entry from the living room
And, here's the living room. We plan on painting to lighten it up a bit, making it more airy {especially those painted ceilings!}, but just LOVE the warmth and charm of the area! Super cute!
Subscribe to:
Posts (Atom)